Mike T Posted September 21, 2019 Author Report Share Posted September 21, 2019 Other side's done. Saturday I"ll do some final trunk trimming and then move onto the door panel pre-fitting/installation. Quote Link to comment Share on other sites More sharing options...
Mike T Posted October 9, 2019 Author Report Share Posted October 9, 2019 Since then I've mounted the forward side panels, put some black carpet-like insulation behind the Sofica heater unit and re-threaded the two stripped driver's seat captive nuts. This coming weekend the headliner should be professionally installed and then I can do the front and rear glass (I hope, without help). Quote Link to comment Share on other sites More sharing options...
Mike T Posted October 16, 2019 Author Report Share Posted October 16, 2019 Heater controls mounted - all silver cadmium plated Both rear quarter panel trims were mounted. New headliner mounted. Front part is not mounted because the windshield has to go in first. That's one of the next tasks: front and rear windshields. Quote Link to comment Share on other sites More sharing options...
Harry K Posted October 17, 2019 Report Share Posted October 17, 2019 Everything coming together. Headliner is looking very nice Mike. Quote Link to comment Share on other sites More sharing options...
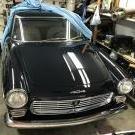
Goce Posted October 20, 2019 Report Share Posted October 20, 2019 It is interesting to me how this 404 is built, the insolation, construction, rubber floor mats, it reminds me of Fiat's and Lada's from that time. That said you really are doing quality job restoring and reassembly it and that body color, that deep blue in the photos really looks good. Quote Link to comment Share on other sites More sharing options...
Mike T Posted October 21, 2019 Author Report Share Posted October 21, 2019 Thanks! Well, the body is Italian! Quote Link to comment Share on other sites More sharing options...
Mike T Posted October 26, 2019 Author Report Share Posted October 26, 2019 New carpets custom made for the 404C by Geoff Chrysler in Highlands BC. Wilton wool. Quote Link to comment Share on other sites More sharing options...
Mike T Posted October 27, 2019 Author Report Share Posted October 27, 2019 Seat slides (NOS) hand painted in Krylon semi-gloss after tidying up. Upper door replica panel for a Cabriolet modified by me to fit the Coupé and it worked reasonably well. The shape difference is quite remarkable and quite a bit of work was needed. The panel completely installed, taken from inside the car with the door closed. Quote Link to comment Share on other sites More sharing options...
Harry K Posted October 27, 2019 Report Share Posted October 27, 2019 This looks sharp, great job, fantastic ! Quote Link to comment Share on other sites More sharing options...
Mike T Posted November 3, 2019 Author Report Share Posted November 3, 2019 Jenn (one of our three adult kids) picked up the carpets from Geoff in Highlands Friday afternoon, as well as a roll of trunk lining. The carpets were test-fitted without the sound deadening insulation in place so it looks a bit baggy. Also, the bit of fibreglass that's visible behind the shifter hole will have blue vinyl glued to it. It's fine and will look most excellent when the car is done! The trunk insulation is essentially a protectant that is glued onto the inside of the rear panel of the car and the inside of the rear fenders. The material is a fibrous mat with bonded pebbled vinyl, a good approximation of the original stuff. If a suitcase or anything else shifts in a corner, the padding will prevent my (NEW!!) fenders from being dented from the inside out. Lastly, I ordered some new sill trim clips from Le Club 404 because the ones I had bought from them about 25 years ago were damaged during the test fitting of the trim to the 404C in the primer stage. The little teeth that grip the seam were brittle and some snapped off after it was removed. So I ordered a second set, from a revised batch from Le Club 404 a few weeks ago. The material is spring steel, which means they should be reusable, but as you can see, they were rusty. So I had them cadmium plated (not cheap, but far better than paint) and I will have to RE&RE the sill stainless steel trims soon to put these on. Quote Link to comment Share on other sites More sharing options...
Mike T Posted November 4, 2019 Author Report Share Posted November 4, 2019 I had not stored the car sensitively when I had it for 28 years in the garage, with the brakes last being bled in about 1991. So when I disassembled the car in 2016, the cylinders all looked awful and I thought they might be toast. Turned out they're not. New Cunifer brake piping - all metal lines will be replaced. Hydraulic hand tool to double and bubble flare en route from USA right now. You can see the brake cylinders before cleaning and painting. Rear brake proportioning valve piston - L=NOS (not so good); R=original (quite good). So the old valve will go back in the car. The two complete proportioning valves disassembled. The one with paint is the NOS one. Painted front wheel cylinders, which came up nicely after a hone. The old proportioning valve with the sealing nut off, showing how the piston appears. It was moving smoothly! Rear wheel cylinders (tiny bore, 16 mm) repainted and kits galore available to replace all the wear items. Quote Link to comment Share on other sites More sharing options...
Mike T Posted November 24, 2019 Author Report Share Posted November 24, 2019 I used this new S.U.R.&R. PFT409 brake flaring tool..... ....to make my first ever brake line: And wow is that tool ever amazing! Perfect DIN bubble flare every time. The pistol grip tool is hydraulic. Expensive but worth it if only for the knowledge that I can't mess up. This line is the one that connects the two front Thermostable brake cylinders. Quote Link to comment Share on other sites More sharing options...
Mike T Posted December 1, 2019 Author Report Share Posted December 1, 2019 Brake lines are done, except for one little one that I need to buy two more unions to make. Quote Link to comment Share on other sites More sharing options...
Mike T Posted December 2, 2019 Author Report Share Posted December 2, 2019 Jute-backed vinyl sound deadening glued onto cowl panel today. I also cleaned up the front brake cylinder springs and reassembled the rear brake proportioning valve. Quote Link to comment Share on other sites More sharing options...
Goce Posted December 4, 2019 Report Share Posted December 4, 2019 That is not a lot of hard brake lines. Always use box line wrench on the brass fittings and get them as tight as you can, they need to seal, i can't count how many times i've had to fix brakes that someone else has changed lines and ether used wrong fittings or hasn't tighten the lines hard enough. Always use two wrenches when tighten lines so you won't bend the brackets. Otherwise you are doing a great job, do you have a timeline in main to get the braking system finished. Quote Link to comment Share on other sites More sharing options...
Mike T Posted December 4, 2019 Author Report Share Posted December 4, 2019 The fittings aren't brass, they're cadmium plated steel. Brass is too soft. The procedure for working on brake lines is well known to me. The main outstanding item is that the Hydrovac booster needs to be sent out early in 2020 for a rebuild in the eastern USA. It was NOS in 1993 but has been on the car for 26 years. A new OEM master cylinder and some additional brake kits and sealing washers are on their way to me from Germany as we speak. Then I'll have all I need to complete the work. Quote Link to comment Share on other sites More sharing options...
Goce Posted December 6, 2019 Report Share Posted December 6, 2019 Yeah, Old OEM parts on cooling and braking systems are no good, i've recently found out that even never used parts in OE packaging go bad over time, staff like brake cylinders, boosters, pumps dry rot easily when not used everyday. Working on the Little Niva has been a joy in that aspect, because is still being made, and russia is not too far away i can buy parts couple weeks old and they fit and work way better and every single thing is available. Keep the updates coming i love seeing the beautiful work you are doing. Quote Link to comment Share on other sites More sharing options...
Mike T Posted December 7, 2019 Author Report Share Posted December 7, 2019 More Cunifer line - seamless - bought, this time for the fuel lines (supply and return). I'll bend them up and mount them this weekend. Diameter is 5/16 inch (about 7.95 mm). Quote Link to comment Share on other sites More sharing options...
Mike T Posted December 8, 2019 Author Report Share Posted December 8, 2019 $25 buys this Mercedes-Benz W115 manual shifter boot, perfectly sized for the Nardi floor shifter of the Peugeot 404. Super soft rubber. The one on the right is the old boot from the car. Just got it today in Victoria. Mounted it in the new carpet when I got home. Trimmed off the thick part of the rim from below, but the rings are perfect! Quote Link to comment Share on other sites More sharing options...
Bean Posted December 8, 2019 Report Share Posted December 8, 2019 Great progress Mike! Is the rubber shift boot visible or is it the dust boot on the transmission tunnel? Rabin Quote Link to comment Share on other sites More sharing options...
Mike T Posted December 8, 2019 Author Report Share Posted December 8, 2019 Visible, it sits in the hole in the transmission tunnel carpet. I added a couple of photos to show that after I got home. Quote Link to comment Share on other sites More sharing options...
Mike T Posted December 9, 2019 Author Report Share Posted December 9, 2019 Bent up the 8 mm copper-nickel tubing for the 2 fuel lines - using the old ones as a template and zap strapping them together during the bending. Then I mounted all the hard brake and fuel lines under the car. In the process I cleaned the garage floor, with my hair. 6 hours all in. Quote Link to comment Share on other sites More sharing options...
Mike T Posted December 16, 2019 Author Report Share Posted December 16, 2019 Today I had about 4 hours to get some things done, so I cut the inner rear fender protectant and trunk floor insulation, mounted it, put the rubber mat in and clipped it into place with the 4 large modern plastic clips (better than the rubber originals and easier to use!). Then I mounted the front fuel line retainer that holds the two fuel lines at the front end of the car, mounted the cage nuts on the road wheels and finally glued the seal to the fresh air intake. Quote Link to comment Share on other sites More sharing options...
Mike T Posted December 18, 2019 Author Report Share Posted December 18, 2019 That rubber's a bit too high to latch the hood so I'll have to trim it down a little soon. Today, I had a look at Sander May's stainless steel replica exhaust, and installed my NOS Peugeot heat shield . The diameter of the replica resonator is a bit smaller than the original Peugeot resonator in mild steel, so I had to make up a couple of small spacers in aluminium to allow the bands to clamp onto the body. Soon to be mounted on the car using all original Peugeot NOS mounting hardware. The third photo shows one spacer, which is on the upper side of the resonator, so it's not visible from below. Quote Link to comment Share on other sites More sharing options...
Mike T Posted January 3, 2020 Author Report Share Posted January 3, 2020 December 21: The lower dashboard pad had a rusted captive bolt embedded in the backing foam that I replaced a day earlier...on the far right upper side. After being glued back in place and curing for a day, I mounted it: Steering column controls mounted (headlight, turn indicators, wiring to ignition switch): Note the cover for the rectangular hole in the steering column, part of the Nardi floor shifter kit: The fresh air intake gasket required a bit of a trim to allow the hood to be latched: A bit of light work after Christmas on the 27th: 1) wired up the extra interior light so it is a map light only (independent of the ceiling light)...may decide to change that later so it works with the doors too. 2) mounted the electric screen washer pump behind the steering column and got some new tubing to fit, as well as a new ABS T-fitting. Installed a one way valve so it won't drain back when not in use. 3) developed a wiring diagram to connect the Swedish market two speed rotary wiper switch, which also has a push function to operate the screen washer. The first owner fitted two speed wipers when the car was a few years old but I didn't like the rocker switch he used. Next I will tackle wiring up the switch or install the driver's door upholstery panel. May even attempt the rear window installation if I get ambitious enough. On Saturday the 28th of December the driver's door panel got mounted. You might think it's a 10 minute job, but it's not. The replica upper door panel is for a Cabriolet and required a whole lot of modification to fit. Both sill plates are mounted with the OE plastic rivets. On December 29th: Stainless steel rear exhaust mounted with original Peugeot OE belts/hangers: And the middle section is mounted too, held in place temporarily with a zap strap: Flexible hose between floor and torque tube mounted to my homemade brake lines: Right front brake hose mounted (the end is capped): And left front (you can see the cap on the end in this photo): Left front side bumper mount added. The cage nut had flown the coop many years ago and so getting the long bolt started into the nut I was hanging onto with a dab of butyl was a bit of a challenge but it worked better than my attempt with magnets! In 2020 so far I've degreased the original head, which is in good condition, for storage as well as the valvetrain. The rocker shafts are mega-scored and require replacement. I had three sets and all have some damage. Seems to be a weak point of the 404 engine design (I expect it's because of sludge blockage in the small oil galleries). I will buy two new ones from Germany, VERY expensive but NOS. I managed to put together a set of good rockers from my three valvetrains. I also mounted the right front bumper side support. Quote Link to comment Share on other sites More sharing options...

Recommended Posts
Join the conversation
You can post now and register later. If you have an account, sign in now to post with your account.