Goce Posted September 2, 2016 Report Share Posted September 2, 2016 For some time i was thinking is this appropriate for this forum or not, at the end i decided to post it just because i'm using Peugeot 1.9 diesel engine and gearbox, now the plan is to build a homemade tug, tractor, loader, its going to be 4 wheel drive by using a FWD gearbox and two rear axles shortened, and for steering it will be articulated, the main use will be towing cars and clearing snow, the reason why i'm building one rather than buying one from a store, is quality and the astronomical price, i like building stuff from scratch using scrap parts, i hope you all like and following this build. Quote Link to comment Share on other sites More sharing options...
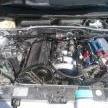
Goce Posted September 2, 2016 Author Report Share Posted September 2, 2016 For the engine i'm planning to use this XUD9, 1905cc 65 hp 118 nm came out of a 1984 Peugeot 305 it should have more than enough power and by using the FWD BE3 gearbox i'm gearing down the drivetrain to a usable speed. Quote Link to comment Share on other sites More sharing options...
Mike T Posted September 2, 2016 Report Share Posted September 2, 2016 Bobcats used this engine. They're all over North America. Quote Link to comment Share on other sites More sharing options...
Bean Posted September 2, 2016 Report Share Posted September 2, 2016 Definitely a worth item on the forum! Looking forward to progress, and very curious how you make out. Years ago a good friend and I schemed on mounting a FWD Honda drivetrain longitudinally in a locost chassis for 4x4 slalom car.... Suitable diffs was the problem since they would gear down too much for a race car, but should be perfect for your tractor build. Rabin Quote Link to comment Share on other sites More sharing options...
Goce Posted September 2, 2016 Author Report Share Posted September 2, 2016 3 hours ago, Mike T said: Bobcats used this engine. They're all over North America. I didn't know about bobcat, that they use the xud, i've seen couple forklifts with factory xud9. Quote Link to comment Share on other sites More sharing options...
Goce Posted September 2, 2016 Author Report Share Posted September 2, 2016 For the rest of the parts that i'm going to use for this project, this is what i've sorted, fiat 1500 rear axle, mazda rx7 rear axle, shifter and cable from a Mitsubishi Eclipse, steering box form opel omega, couple of oil lines for hydraulics, next thing i need to do is to disassemble the axles because i need to shorten them and to check the gear ratios, they seem close, if they are different i'll probably run different tire sizes to composite, as for dimensions i must shorten the axles, i need the tug to be 70-80 centimeters wide, as for the deadline i'm sitting before the first snow. Quote Link to comment Share on other sites More sharing options...
Goce Posted September 3, 2016 Author Report Share Posted September 3, 2016 Well i've been awake for two days straight so when i came home i was tired to be welding so i decided to work on this project, i disassembled both axles, no big surprises there little water in one from sitting without driveshaft flange, the diff ratios are 3.9 and 4.1 so i'm going to run bigger wheel in the back smaller in front, i'm planning to buy a lathe which will make shorting the axles easy, more to come. Quote Link to comment Share on other sites More sharing options...
Goce Posted September 5, 2016 Author Report Share Posted September 5, 2016 I've been catching up on some sleep but i manage to buy some steel for the frame of this project, is 60x40x3,5mm it should be strong enough, they are really heavy, more to come. Quote Link to comment Share on other sites More sharing options...
casm Posted September 6, 2016 Report Share Posted September 6, 2016 Having had three 205 XRAD vans with the XUD7 (IIRC) in them and always wanting to upgrade to the XUD9 with a turbo, this is definitely holding my interest Quote Link to comment Share on other sites More sharing options...
Goce Posted September 6, 2016 Author Report Share Posted September 6, 2016 I haven't had much free time but i'm sinking in every hour i can, today i clean up the mess i made disassembling the axles, then started removing the engine from the ridiculous wooden holder, then i separated the gearbox, because i won't use it, i have a proven good be3 5 speed, then i took the clutch to see what condition is in and is pretty worn, the pressure plate looks good so i'll probably just replace just the disk, i've notice the disk and pressure plate stamped 84 for production year, i know that the engine is from a 1984 305, is it possible that the factory use( Luk ) clutch and is the factory 32 years old clutch? Quote Link to comment Share on other sites More sharing options...
SRDT Posted September 7, 2016 Report Share Posted September 7, 2016 Yes LUK and Valeo are oem, just looking at the cam cover you can see that this one is a really early XUD. The 71hp XUD9A use another head with oval intake ports like the XUD7TE and a slightly different camshaft profile. Despite introducing the "A" at the launch of the 405 Peugeot kept the old XUD9 for the 309 and also as the only EGR equiped XUD for foreign markets. Quote Link to comment Share on other sites More sharing options...
Goce Posted September 7, 2016 Author Report Share Posted September 7, 2016 This confirms what the seller said that is a low mileage well service engine also when removing the support bearing for the passenger axle it was loctite in place and the bellhousing bolts wore very tight, as for the year it was made in 1984 this is the date on the timing cover. My father's 405 has a xud9 but with a different block casting same 1905cc 65 hp bulletproof engine, personally i like them much beter then the DW8 even i took my driving test in a 206 with DW8 . Quote Link to comment Share on other sites More sharing options...
SRDT Posted September 8, 2016 Report Share Posted September 8, 2016 Late 84 production stamp so at least 1985 model year. Quote Link to comment Share on other sites More sharing options...
Goce Posted September 9, 2016 Author Report Share Posted September 9, 2016 SRDT i think you're right, that's october november 84 stamp, the car is older then that, now i think the engine must been changed early in its life. Quote Link to comment Share on other sites More sharing options...
SRDT Posted September 9, 2016 Report Share Posted September 9, 2016 The engine was a new design at the time so some may have had problems. I found a spare parts list for you, there is also interesting things to see about early XU design. http://public.servicebox.peugeot.com/classic/AIDE/8305/FB/G0/index.html Quote Link to comment Share on other sites More sharing options...
Goce Posted September 9, 2016 Author Report Share Posted September 9, 2016 Thank u SRDT, today i found one hydraulic cylinder for the front basket, its from a lorry for tilting the cabin, it uses atf and as i plan to use power steering pumps should workout perfect, now i need to found 2 more and couple of valves. Quote Link to comment Share on other sites More sharing options...
Goce Posted September 14, 2016 Author Report Share Posted September 14, 2016 I've been busy with everyday stuff and last couple of days i've been organizing the spare parts to make more room for the heating palette, in the meanwhile i've bought couple of wheels for this build, i was looking for steel wheels but those aluminium will do, they are different size front to back and different bolt pattern, the tires are old and all different tread, at the end will get couple of off road aggressive tires for better traction, and i've got a lead on couple more things that i need to buy for it. Quote Link to comment Share on other sites More sharing options...
Goce Posted September 15, 2016 Author Report Share Posted September 15, 2016 Got couple more parts for this build, first of which those brakes from a YUGO they should fit on the fiat axle without any modification, after a couple of days looking was able to find the BE3 5 speed gearbox that i plan to use, and got the valeo clutch disc from that car, parts are sticking up up just need to start the build. Quote Link to comment Share on other sites More sharing options...
Goce Posted September 17, 2016 Author Report Share Posted September 17, 2016 Have you got that feeling you behind and you haven't even started, that's what this feels like, so decided to start on the frame, i wasn't confident that my 4" grinder would be up for cutting them, so i took them to a friend how has a very well equipped workshop and is a pro at welding, so they are cut at 22.5 degrees and form a 45 degree angle, they should form my frame, more to come Quote Link to comment Share on other sites More sharing options...
Goce Posted September 24, 2016 Author Report Share Posted September 24, 2016 Quick little update, electricity in the garage has been out most of the time when i'm free, the electricity company is rebuilding the power grid, so no electricity i can't weld, cut, ground, paint so everything is at a standstill, i've managed to disassemble this Lada rear axle, i plan to use those wheel bearings for the Articulation of the frame, should be interesting welding that thick peaces. Quote Link to comment Share on other sites More sharing options...
Goce Posted October 20, 2016 Author Report Share Posted October 20, 2016 I haven't forgot about this project, i've been spending all my spare time on the mi16x4 project, in the meanwhile, i've acquired this fuel tank for this project, and couple of axles,the plan going forward is to finish protecting and painting the mi16x4 engine bay then to split the time between it and this. Quote Link to comment Share on other sites More sharing options...
Goce Posted March 20, 2017 Author Report Share Posted March 20, 2017 Tap - tap - is this thing on? The timeline for this project came and went, but i'm finally getting around to starting it. Couple of things has changed in the meanwhile, now i have a lathe, wich should make the axle shortening possible, the first plan was to outsource them to a local machine shop, first ting i did is clean the welding table, and put the fiat axle together and measured it and figured out that i need to remove 65 centimeters from it, so 32,5 from both sides, then i used a angle grinder and wire brush, and clean the outside, this part is nearly 50 years old so there was a lot of oil and grime, then i chunk up the axle housing in the lathe, tried using the study rest but the housing is made from pressed steel pieces welded together so there is nothing round, tried to clean put a place but after cutting 1,5 mm it was not round, letter when i started cutting it off i realized that is close to 7 mm out of round, after an hour of turning i managed to cut the center piece out, then moved on the bearing flanges, and cutting them thinner to be able to slide to the size i need, next i need to align the flange and weld them to the housing and move to shortening the drive shafts, it's going to be a slow process to do it right and i have one more to do for the rear, more to come. Quote Link to comment Share on other sites More sharing options...
Goce Posted March 21, 2017 Author Report Share Posted March 21, 2017 Today i continued to work on the axle, started by cleaning the axle shafts and chucking them in the lathe, the plan is to shorten them, but make them slip one in other, because the axle is tapered and this should make it stronger. I had clean a spot for the study rest, and tried to cut it with a HSS tool, but the shafts are hardened probably heat treated, so only way was to use my angle grinder while the lathe was turning after cutting them i drill and rim the big end for a interference fit. Then i took them to the big garage and welded them and the housing, then i spent an hour cleaning and sorting all the bolts and parts needed to assemble it, i need to clean the diff member and start assembling it, more to come. Quote Link to comment Share on other sites More sharing options...
Goce Posted March 22, 2017 Author Report Share Posted March 22, 2017 Today i continue assembling the axle, first i dry assembling it and found that the welds on the axle shafts are interfering with the housing, so i chuck them in the lathe and cut down the welds, then i clean all the flanges and finish assembling it, it went together well, i need to free one of the bleeder on the brake calipers, its a aluminium caliper and steel bleeder and the top is snapped off, tried welding a nut and applying heat it snapped again, i'll give it another try if it don't works i'll have to drill it out, more to come. Quote Link to comment Share on other sites More sharing options...
Goce Posted March 23, 2017 Author Report Share Posted March 23, 2017 Today i continued to assemble the axle, first tried to unscrew a stuck and snapped bleeder screw but it just snapped again, so i had to drill it out and tread the hole, after that i assembled the brakes, run a tap thru the wheel bolt holes and installed the wheels, it is surprisingly heavy when all assembled, after that i started on the other axle, assembled it and measure it and found out that the diff is 6 centimeters off center probably to line the driveshaft in the original RX7, now i can shorten one side more then the other and make it in the center to be more symmetrical and to line up with the center of the frame, the housing should be easier to shorten but the axles have the drum brakes on them and will make turning them more hazardous, this axle seems to have had a harder life but should be good enough for what i'm doing with it, more to come Quote Link to comment Share on other sites More sharing options...

Recommended Posts
Join the conversation
You can post now and register later. If you have an account, sign in now to post with your account.