Bean Posted November 4, 2016 Report Share Posted November 4, 2016 While researching how to finish my aluminum Peugeot road bike - the best way to keep that finish is to clear anodize it. Aluminum will always oxidize in air unless that chemical reaction is halted and anodizing does this. Clear coat doesn't stop the oxidation process as well, which is why clear usually ends up flaking off. Flip side is to leave it raw and keep it polished / waxed. Rabin Quote Link to comment Share on other sites More sharing options...
Goce Posted November 4, 2016 Author Report Share Posted November 4, 2016 Yes Rabin i know what you're thinking, i do have experience with polish aluminium, but this valve cover is magnesium and is hard to tell in the pictures but i've done sort of a machined texture, like the surface of a cylinder head, i don't think it will flake off, i will not know if i don't try, if i wax it or polish it i will lose the matte black look, magnesium is a new material to me. Quote Link to comment Share on other sites More sharing options...
SRDT Posted November 4, 2016 Report Share Posted November 4, 2016 Speaking about magnesium always keep in mind that magnesium powder and shavings burn very, very very well. Quote Link to comment Share on other sites More sharing options...
Goce Posted November 4, 2016 Author Report Share Posted November 4, 2016 Yes is more like an explosion then a burn, much harder material to work with than aluminium. Quote Link to comment Share on other sites More sharing options...
Bean Posted November 5, 2016 Report Share Posted November 5, 2016 Oops - forgot the cover was magnesium! Googled it quick and it also oxidizes like Aluminum in air. Apparently it also can build up gasses so best to heat it up and then paint immediately when warm. Etch primer and paint appeared to be the ideal. So in your case maybe best would be to paint the fins? Chrome tape? Rabin Quote Link to comment Share on other sites More sharing options...
Goce Posted November 5, 2016 Author Report Share Posted November 5, 2016 Oh yes the oxidation is much worse than aluminium, in moist air you can see it go grey in front of you in minutes. Quote Link to comment Share on other sites More sharing options...
Goce Posted November 5, 2016 Author Report Share Posted November 5, 2016 Today i had lots of work to do out of the garage, but did not wanted to lose momentum on this project, so decided to put in two hours that i had, started by test fitting the new oil pressure sensor, the distribution block, at the moment i have a plug in it, but i plan to get the oil supply for the turbo from there, then i decided to relocate the LPG control panel, it is the same size as the switches, in its current poison the indicator stalk blocks the view, the top row of leds is the lpg level indicator, the better space to install it is in the spare switch location but i already have my home build wideband air/fuel ratio led gauge, it works perfectly but i bought a gauge with digital display, so decided to remove this one, the trim panel with the hole needs to be replaced, i might have one, but i have to look for it in later date, the wiring in the fuse panel is a bit of a mess because i have couple of security systems and other devices just stuck in there, i will clean it up when the engine is in the car, that way i can test it as i go, also mounted and secured the gauge pot and run the wires to the fuse panel, then i started preparing the gearbox for mounting it, i installed the bleeder screw and the new stainless flex line, the hydraulic shop seems to have made the the line couple of centimeters shorter than i order it, and its now gone out of business, when i install the engine and box in the car this will be my first thing to test and connect to see if it will work, more to come. Quote Link to comment Share on other sites More sharing options...
Goce Posted November 6, 2016 Author Report Share Posted November 6, 2016 Today i spend most of the day in the garage, did only a couple of things on this project, i had to redo the shifter, it was too close to the output shaft, and the old shifter was ugly, i runout of flat stock so i made the new of 10 mm C45 round stock, when i finish it i painted it black, also painted the driveshaft, the rest of the day i did lot of reorganizing of parts and other tings around the garage, more to come. Quote Link to comment Share on other sites More sharing options...
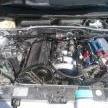
Goce Posted November 7, 2016 Author Report Share Posted November 7, 2016 Today went searching for parts, bought couple of gearboxes for other projects, after unloading the boxes, started back on the valve cover, mix little acrylic 2k clear coat, and apply it on the fins, than i prepared everything to be enabled to instal the valve cover on the engine, degreased all the surfaces, applied silicone on the edges, clean the bolts, they are chromed, it seams peugeot spend some money to make those engines look good, no plastic beauty covers, then i installed the cover and tighten it in the correct order, from the middle out, then i prepared and mounted the gearbox, after that i mounted the exhaust manifold, some of those bolts are almost impossible to get a wrench on, then i started mounting things that are going to be hard to access with the engine is in the car, like the crank posison sensor, starter motor, and then i made a extension plug for the reverse lights, this way should be simple as plug it in, i'm waiting on some heat wrap to arrive to complete that part for the engine to go in the engine bay, on second thought i may go to the hardware store and look for some kind of heat barrier insolation that i can use in automotive use, more to come. Quote Link to comment Share on other sites More sharing options...
Goce Posted November 8, 2016 Author Report Share Posted November 8, 2016 Today first i went to the hardware store, only thing for heat shield was this 10mm rope, i'll probably replace it when the proper stuff arrives, and then started mounting the engine, its becoming easily every time i do it and after more then 50 times it was in less than half an hour, then i connected the clutch line and bleed the system, the pedal feels strange, i have to adjust it and find a way to test it, after that i mounted couple more things like the coolant neck for the block, now i have to decide how to go forward, should i install the bigger pieces first and then shape the rest to adapt or should i start with the wiring loom and the shape the hoses and other pieces ? Quote Link to comment Share on other sites More sharing options...
Goce Posted November 9, 2016 Author Report Share Posted November 9, 2016 Today i spend couple of hours in the garage, did lot of work on the intake manifold, did lots of grinding outside and inside, almost all done on the outside but for the inside it was much harder, and i'll have much more to do, when waiting for the tools to cool down, decided to install the shifter, it went in as it should and works perfectly, short and precise with the mechanical feel like the bolt action on a rifle, the intake is one of the last big pieces that need to be finished to be able to finish this project, on another note i was looking on the roadkill page they had a article for the italian, france car show, and looking thru the pictures, number 52 i see a mi16 engine with red valve cover and black inlet manifold, very familiar, than in picture 88 i spotted savo's mi16 with the hood up, looking great, i was very pleased to see such a deserving car getting the attention it deserves more to come. Quote Link to comment Share on other sites More sharing options...
Goce Posted November 11, 2016 Author Report Share Posted November 11, 2016 Last two days I've spent a lot of time on the intake manifold, the reason is there is a lot welding slag and splinters, and being so tight i can use only air tools which don't take a lot of material quickly, so it a very slow progress, in between working on the intake, i did finish couple more things, first of which was to make a new panel for the center console, this use to be storage but now the tunnel is in the way, priestly i make one of wood and one of aluminium, to aluminium one distorted when i was cutting it so the new one i made from steel, little harder to work with but should hold its shape better, then i mounted the sway bar, all bolted as it should, and then i started mounting the cooler, intercooler and radiator, started by cutting little from the radiator support and mounted it to the car, then i started on tha radiator, and the bottom mounts were missing the frame so welded couple of mounts and drilled holes for the factory grommets at the end i painted them to stop them from rusting, i need to make couple of air ducts to channel the air to the radiator, as a priority i'm putting the inlet manifold because i need a friend of mine to weld it for me and that is one thing that is out of my control, so better done sooner than later, the interior panel is all done and painted and apart from couple of gauges interior is completed and the engine bay is coming along also, more to come Quote Link to comment Share on other sites More sharing options...
Goce Posted November 14, 2016 Author Report Share Posted November 14, 2016 The last couple of days have been very busy for me, but i've been using every free minute to finish anything i can on this project, some of the things i did was, i install a new distributor cap and wires, then i install the battery tray and the LPG ecu after that i started laying the engine wiring to see how they fit and quickly realized that the hole where the engine ecu wires pass thru is gone, is use to be where the distributor cut out is, so i drill a new one next to the one for the abs wiring, then i started with the air bleed hoses, at first i reuse the original mi16 hose that use to go from the throttle body to the radiator, i placed it to go from the top of the thermostat housing to the expansion tank and was going to cap the other nipple, then decided to run another line from what use to be the backside, there was a bleeder screw so i just find a fitting to tread in the M6 treads and from there it was a simple hose to connect them, the intake manufolt is taking very long time to preper for welding, more to come. Quote Link to comment Share on other sites More sharing options...
Goce Posted November 14, 2016 Author Report Share Posted November 14, 2016 Today i finally finished grinding on the intake manifold and i made a new piece to cover the hole, only thing left is to have my friend weld it for me, also spend couple of hours on the wiring, i clean some of it but i have way to go, basically all the wires that use to go behind the engine are cooked, and are been replaced with new ones, i also relocate the fuel pump fuse and relay in the ecu box and that left me about 1,5 meters extra ecu loom that i need to hide somewhere, i also finish the new center console cover, the temp gauge corresponds with the temp sensor i install in the differential the center pressure gauge is going to be connected to the coolant system, this is something i've learned to observe over the years and last simple voltmeter to fill the hole, i may install another temp gauge for the gearbox or exhaust temps, the black switch on the left is a high amp switch for the second fuel pump, the illuminated blue switches are for manually switching the cooling fans, 1 speed and 2 speed, and the the last is empty, to be use later, i've wired them to a connector to be easy to remove them if i have to remove the console, it was a long day my hand are all swollen from the grinder kicking back and my ears are ringing from the compressor, more to come. Quote Link to comment Share on other sites More sharing options...
Goce Posted November 15, 2016 Author Report Share Posted November 15, 2016 Today i had to undo some of the work i've done yesterday, had to remove the battery tray, i had a lot of space there and it is close to the coolant supply, so i place the LPG evaporator there, making the bracket was easy, then i went thru all my rubber lines and find a coolant line that will do the job, in which i installed the coolant temp sensor for the lpg, then tried using the lpg supply copper line which was too long, so again i had to go thru my supply of hard lines and found a shorter one, after bending it i placed it to be as invisible as possible, next in line should be power supply cables, i like to replace them because the old ones have marks from stuff rubbing on them but i don't know what gauge wire go get, stock one seam to thin, more to come. Quote Link to comment Share on other sites More sharing options...
Goce Posted November 16, 2016 Author Report Share Posted November 16, 2016 Last night temperature dropped down to -3 celsius, i'm sure someone will laugh but for this parts that's cold, so i stayed out of the garage, warmer days are coming soon i'll be back working on it. Quote Link to comment Share on other sites More sharing options...
Goce Posted November 17, 2016 Author Report Share Posted November 17, 2016 Today i started by rooting the engine ecu wires and cable tied them in place also installed the ecu and the fuel pump relay fuse all in the ecu box now is full, then i installed a ground strap on the passenger side engine mount, after that i installed one more on the on the drivers side, i like using this style ground straps, they can take decent amount of amperage, and last long time, then i installed the main ground cable directly to the starter bolt, also installed thick cable to the top ot the shock absorber bolt and installed the strut bar i made couple of months back, than i spend 4 hours on the wiring and used two entire rolls insulation tapes, replacing wires, elongating wires, replacing connectors, routing wires, away from heat and sharp things, i had to stop there i'm waiting on the the intake manifold to be enabled to route all wires and hoses, more to come. Quote Link to comment Share on other sites More sharing options...
Goce Posted November 18, 2016 Author Report Share Posted November 18, 2016 Today i did some fabrication, i made a dual fuel filter holder bracket, as i have already installed dual fuel pumps i need two filters and i'm running out of space back their, best place i found is next to the hydraulic cylinder that is just enough space for two filter so the bracelet i made brings them as close as possible, and i need a way to attach them to the car, i may leave attaching them when i'm doing the exhaust so i can weld the bracket to the subframe, i've had bad experience with fuel leaks and that is why i'm going to such an effort to make i right, more to come. Quote Link to comment Share on other sites More sharing options...
Goce Posted November 20, 2016 Author Report Share Posted November 20, 2016 I've been at a standstill last couple of days because of the inlet manifold, and finally my friend was enable to weld it for me, when welding we had an old weld crack, so we welded over the old welds to ensure no more cracks or leaking, now i have little more modifications to do to it, and make it look better, i'm tempted to smooth it and paint it silver, also got the drive shaft flange welded, tig welding is the way to go when precision and strength is needed, i plan to work on the inlet manifold next couple of days till i finish it, more to come. Quote Link to comment Share on other sites More sharing options...
Goce Posted November 21, 2016 Author Report Share Posted November 21, 2016 Today i worked on the intake manifold, first i smooth the inside then i smooth the outside then i drilled and tapped the throttle body, for the engine crank pressure system, then i drilled and tapped couple more vacuum ports, i don't like splitting vacuum lines, after that i drilled tapped and filed flash the LPG nipples, now they are smooth so they don't affect the air flow, the plan going forward is to spray the entire manifold in high build primer to make it smooth and then paint it silver, more to come. Quote Link to comment Share on other sites More sharing options...
Goce Posted November 22, 2016 Author Report Share Posted November 22, 2016 Today i stayed on plan and continued working on the intake manifold, late last night i pressure wash it, and it dried over night, today i clean it with paint prep the masked it, after that i applied adhesion promoter, and then i sprayed couple of coats of high build primer, it's thick and should come out smooth, now it has to dry and shrink before sanding, more to come. Quote Link to comment Share on other sites More sharing options...
Goce Posted November 24, 2016 Author Report Share Posted November 24, 2016 Last two days i've been wet sanding the inlet manifold, it's not perfect but it should do the job and not look so ugly, i've just finished painting it silver to match the body color, it needs to dry well and i can resume assembly, more to come. Quote Link to comment Share on other sites More sharing options...
Goce Posted November 25, 2016 Author Report Share Posted November 25, 2016 Today i've worked my fingers to the bone, laterally 12 hours working around the engine, had to run all new coolant hoses for the Lpg evaporator, oil cooler, then extend the wires that didn't reach, all of this just to be enabled to install the intake manifold, there's a lot of hoses and wires under it and i was planning to install the LPG injector there, but there was simply no space left for them, so i put them on top and run the hoses to the bottom, after i install the intake i install the fuel injectors, rail AN6 fittings, oil cap, idle valve, ignition coil, throttle body, i've run into many difficulties assembling them, wich i've resorted but i have couple more, one of which is the throttle position sensor, and the airbox, there is no space for the airbox so as much i hate i'll have to run a cone filter, more to come. Quote Link to comment Share on other sites More sharing options...
Goce Posted November 26, 2016 Author Report Share Posted November 26, 2016 Today i started by resorting couple of problems i had yesterday many around the intake, started by listing the bosch sensor catalogue and manage to find sensor with a wire and same characteristics now the conector can reach, i did not want to cut and extend the sensor wire that will change the ecu readings, than i made this adapter plate from AFM to 75mm cone filter, more to come. Quote Link to comment Share on other sites More sharing options...
SRDT Posted November 27, 2016 Report Share Posted November 27, 2016 The stock throttle sensor is just a double switch, that's probably one of the few sensors that can be extended safely as the ecu is looking for a logic state and no a resistor value. Quote Link to comment Share on other sites More sharing options...

Recommended Posts
Join the conversation
You can post now and register later. If you have an account, sign in now to post with your account.