Mike T Posted February 22, 2021 Author Report Share Posted February 22, 2021 So meanwhile, I decided that the stainless steel license plate mount on the back of my Mercedes is very nice, heavy gauge and ideal for the 404C. It will prevent the front plate from bending if it gets a "light kiss" in a parking lot, for example. So I bought on from a wrecker, had to drill two holes to match the 404C bumper holes and mounted it. This is much nicer than the original rusted one that I threw out some years back..which I later regretted.... but now I don't! Quote Link to comment Share on other sites More sharing options...
Mike T Posted February 27, 2021 Author Report Share Posted February 27, 2021 Dropped the rod bearings off at Anderson Precision Engines this afternoon. She's coming together nicely. Quote Link to comment Share on other sites More sharing options...
Mike T Posted March 3, 2021 Author Report Share Posted March 3, 2021 Long block comes home Thursday PM. Of course one of the sets of rod bearings I dropped off there 5 days ago did the trick......... Quote Link to comment Share on other sites More sharing options...
Bean Posted March 3, 2021 Report Share Posted March 3, 2021 Were all your rocker arms in good shape or did they have to redo / polish any of the hardened surfaces? If so curious if they do them in house or if they send out... Very exciting regardless! Is there any goals this is a runner this summer? Rabin Quote Link to comment Share on other sites More sharing options...
Mike T Posted March 3, 2021 Author Report Share Posted March 3, 2021 They slightly refinished a few, likely extreme polishing - they were not bad in that respect - and all were re-bushed in house. Plan is to get her running soonish and do some road trials whenever I can. I expect the brake booster (NOS but it was on the car for 28 years) needs a rebuild but I'll probably try it as is for this stage of work. Maybe I'll get lucky. If not, it'll go to White Post in the eastern USA for a rebuild later this year. It's nice to be winding down the costs of all this work, at this point..... Quote Link to comment Share on other sites More sharing options...
Mike T Posted March 5, 2021 Author Report Share Posted March 5, 2021 Next step now that it's home is to paint the block after getting the flash rust off it. Also got from Peugeot Classic a Peugeot branded warning triangle and a plug wrench to carry in the car. Quote Link to comment Share on other sites More sharing options...
Mike T Posted March 6, 2021 Author Report Share Posted March 6, 2021 So far the only part of the block that was painted, after a good wire brushing, is the orangest part you can see in that photo. I painted it before mounting the external oil line that feeds pressurized oil to the head, which would have made painting it pretty difficult after. The tube itself needed painting and the insides were cleaned out first. Ceramic paint good to 600°C on the cast iron manifold, which was perfectly rust free and clean beforehand. Hope it lasts a while! The other side. The shop rectified the faces of the 4 ports on the manifold so it lost its mild pitting from the past 55 years and should fit the new head beautifully! I also cleaned the clutch fan switch sensor that screws into the radiator and mounted it, cleaned out the oil supply tube between the block and head, mounted it with new copper washers after painting the block behind the tube first, then painted the tube once mounted. Quote Link to comment Share on other sites More sharing options...
Bean Posted March 6, 2021 Report Share Posted March 6, 2021 What colour are you painting the block and valve cover? (Or valve cover in powder coat?) Rabin Quote Link to comment Share on other sites More sharing options...
Mike T Posted March 6, 2021 Author Report Share Posted March 6, 2021 Block: satin black (originally unpainted). Valve cover, timing gear cover in steel and sump are already powder coated gloss black. Quote Link to comment Share on other sites More sharing options...
Mike T Posted March 8, 2021 Author Report Share Posted March 8, 2021 Block is painted and some of the bits and pieces are attached. Threw the header pipe on just for fun! Quote Link to comment Share on other sites More sharing options...
Harry K Posted March 8, 2021 Report Share Posted March 8, 2021 Mike, This looks fantastic ! Like everything else you have and had done to this 404C. Quote Link to comment Share on other sites More sharing options...
Mike T Posted March 8, 2021 Author Report Share Posted March 8, 2021 Thanks, Harry! Quote Link to comment Share on other sites More sharing options...
yhzman Posted March 8, 2021 Report Share Posted March 8, 2021 I'll second HarryK's praise! This is an endlessly fascinating thread and I can't wait til you get 'er out on the road! Quote Link to comment Share on other sites More sharing options...
Mike T Posted March 8, 2021 Author Report Share Posted March 8, 2021 Thanks Quote Link to comment Share on other sites More sharing options...
SRDT Posted March 8, 2021 Report Share Posted March 8, 2021 The block looks great in satin black. Quote Link to comment Share on other sites More sharing options...
Mike T Posted March 16, 2021 Author Report Share Posted March 16, 2021 Thanks! Today I got four new belts from Dean Hunter in England: one of the 1280.01 unadjustable water pump belts and three of the super short 5750.18 alternator belts that are common to 1965-1967 404 KF2 engines. Quote Link to comment Share on other sites More sharing options...
Mike T Posted March 20, 2021 Author Report Share Posted March 20, 2021 Got a few minutes today to mount the flywheel and then attach the frame for the engine stand. And now it's on the stand so the reassembly can resume in earnest. Quote Link to comment Share on other sites More sharing options...
Mike T Posted March 21, 2021 Author Report Share Posted March 21, 2021 Got some assembly done today: timing gears, injection pump, housing and timing cover. Next up is valve cover, oil pump/distributor drive and then sump..... Lining up the timing marks: Tensioner: Injection pump with NOS SEDIS drivebelt, correctly tensioned: All buttoned up: Another view so you can see the rebuilt Kugelfischer injection pump hanging off the housing. Quote Link to comment Share on other sites More sharing options...
Wales Posted March 22, 2021 Report Share Posted March 22, 2021 That engine is looking really good indeed! That injection pump drive seems a bit odd, a belt in oil covered area? What material is the belt made from? I think I have never seen such a construcion before... Anyway keep up the good work, this is really unique for the quality of the details. -Wales Quote Link to comment Share on other sites More sharing options...
Mike T Posted March 23, 2021 Author Report Share Posted March 23, 2021 It's Rilsan plastic with wire reinforcement. Quote Link to comment Share on other sites More sharing options...
SRDT Posted March 23, 2021 Report Share Posted March 23, 2021 The SEDIS belt was ahead of it's time, and also very hard to find for a long time. "Wet" timing belts are now much more common. Quote Link to comment Share on other sites More sharing options...
Mike T Posted March 23, 2021 Author Report Share Posted March 23, 2021 Easy to find now from Peugeot Classic. Quote Link to comment Share on other sites More sharing options...
Mike T Posted March 24, 2021 Author Report Share Posted March 24, 2021 It's basically ready to go in the car. I will not put the intake manifold on now because the chains from the factory hoist bar chafe it so I'll put them on once it's in the car. The distributor/oil pump drive has to be properly oriented before assembly (and retained by the distributor collar or it will fall out when the engine's upside down). Quote Link to comment Share on other sites More sharing options...
Mike T Posted April 5, 2021 Author Report Share Posted April 5, 2021 In between a major bathroom renovation and other home plumbing tasks, I managed to install the new distributor (M50 curve, KF2 spec of course), plug wires, water pump and its famous 1280.01 unadjustable Ventiflex belt. Quote Link to comment Share on other sites More sharing options...
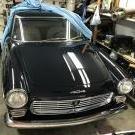
Mike T Posted April 10, 2021 Author Report Share Posted April 10, 2021 The hood has been removed in anticipation of the upcoming engine installation. Ready to go except for me moving the unlicensed smart out of the garage, moving the engine from its stand to the hydraulic crane, mounting the clutch driven disc and pressure plate, then mounting it. I'l have to wait for a day when my eldest daughter is available. Maybe the next couple of days, maybe a bit later. The green tape and padding are some of the precautions I have employed to protect the paint from damage when removing the hood and installing the engine. Quote Link to comment Share on other sites More sharing options...

Recommended Posts
Join the conversation
You can post now and register later. If you have an account, sign in now to post with your account.