Goce Posted May 14, 2016 Author Report Share Posted May 14, 2016 Yes SRDT you are probably right, with all the modifications the car will be about,1,5t, i've like to install like a twin plate clutch, but parts like that are not available near me, and importing specialist parts is way too expensive, if you know any factory setup from another peugeot that will fit the 215mm flywheel feel free to share. Quote Link to comment Share on other sites More sharing options...
SRDT Posted May 14, 2016 Report Share Posted May 14, 2016 There is only the 215mm pull type clutch that is stronger and can fit. The XU and XUD mated with a ME or ML gearbox use a bigger 235mm push type clutch with another flywheel. Quote Link to comment Share on other sites More sharing options...
Goce Posted May 14, 2016 Author Report Share Posted May 14, 2016 Thank you for the suggestion SRDT, i've been around the xu and xud engines alot, my daily driver is using xud11ate and it uses 228mm push type, i have a complete set and flywheel in my garage but ther is no crank triger ring, i have a 235mm flywheel from 3.0 v6 but the trigger ring is different and want work, the gearbox has hydraulic center cylinder, there is no provisions for a fork, there is no way to use the pull type, best i can do is use the highest quality parts and hope that they last. Quote Link to comment Share on other sites More sharing options...
SRDT Posted May 14, 2016 Report Share Posted May 14, 2016 The 2.0 HDI 90hp engines have a special flywheel and a 230mm push type clutch made to fit in a BE casing but you will probably have the same internal diametrer problem. Quote Link to comment Share on other sites More sharing options...
Goce Posted May 14, 2016 Author Report Share Posted May 14, 2016 The gearbox use to have 240mm clutch the bmw engine produced 250 nm i have 2 hdi engines in my garage but they both have variable flywheel, i will look thru the breakers to see if i can find one like the one on the mi16 from hdi. Quote Link to comment Share on other sites More sharing options...
SRDT Posted May 14, 2016 Report Share Posted May 14, 2016 In the 306 HDI the engine is 30° slanted exactly like a XU or XUD (in fact the "new" DW engine was a plain old XUD). In a 206 or newer the EW and DW are slanted at 18°30' so if you use a flywheel from these cars the missing tooth will be 11°30' off ; not a problem with standalone engine management as long as you know it. Quote Link to comment Share on other sites More sharing options...
Goce Posted May 15, 2016 Author Report Share Posted May 15, 2016 I've been looking at hdi flywheels and they are either variable or with different crank ring, the closest i've found was from some van but is only 220mm and the hole in the pressure plate is the same, 5 mm bigger against the cost is not worth plus the stock disc wont work the gearbox has 14 spline, not a waste of time, i've learned alot about hdi flywheels and clutches Quote Link to comment Share on other sites More sharing options...
Goce Posted May 15, 2016 Author Report Share Posted May 15, 2016 After measuring i need to enlarge the hole between the fingers on the pressure plate to 44mm from 30mm after thinking about it, i can't cut them no a lathe only way is with an abrasive stone, so i made this jig from some scrap steel and an old Stanley grinder, worked great until the stone got too hot and melted the glue that was holding it, unfortunately it was my last small stone and been sunday all stores are closed, tomorrow will buy couple more stones, i've enlarge it to 38mm now, 6mm more i'm done. Quote Link to comment Share on other sites More sharing options...
Goce Posted May 16, 2016 Author Report Share Posted May 16, 2016 Today i went to the hardware store and bought couple more abrasive stones, and got back to work enlarging the hole between the fingers on the pressure plate , it took a lot of time and at the end the grinder burnout, but finish the job, i'm satisfied with the resultat, i will wash the pressure plate before final assembly, you can see the difference in size next to the stock one, and i need to cut back the bellhousing much more than i thought, in the picture the throwout bearing is fully extended, the engine and box are surprisingly short, so i have very little floor to cut. Quote Link to comment Share on other sites More sharing options...
Goce Posted May 17, 2016 Author Report Share Posted May 17, 2016 The work continues, started today by making the scraper to mark where to cut it, then i cut it, then i marked and cut the peugeot gearbox flange, i plan to use the top two bolts, crank sensor, starter and left lower bolt, that leaves me to use only one of the original gearbox bolt holes, next thing to modify is the input shaft, i need to cut it at the bearing surface, and turndown the the splines to 15mm, tomorrow have to figure out how to turn it down, do not want to disassemble the gearbox and the spans are hardened steel, ones i do that the gearbox and engine will meet flash more to come. Quote Link to comment Share on other sites More sharing options...
Goce Posted May 19, 2016 Author Report Share Posted May 19, 2016 Today's job was to make the gearbox meat the engine, the input shaft was too long, i needed to turn down the shaft to 15mm and shorten it, started bay welding a nut to the input shaft then used short length of all thread to leave my shelf room to work at the end i simple screw in a 405 wiper motor, then used couple heavy scrap pieces to hold it in place, then i use my angle grinder to make a parting line where to stop, then switch to a grounding stone used it to remove the teeth, then switch to a flop disk to get a better finish, than switch back to the cutting disk to cut the excess while it was turning, at the end switch back to the flap disk, put the box in 1 gear one hand on the output shaft to turn the box in the other grinder to make the end round, i'm satisfied ti turd out much better than it should have turned especially done by hand, after that the gearbox marriage to the engine right, the clutch release bearing seems to be right, and one bolt hole seams to be close enough to be used , then i mark the gearbox again to cut it back more and i cut it, installed the peugeot flange and marriage the engine and box again, they don't meet perfectly but they are close enough, that's enough for today, next job to line them straight and clean them for welding. Quote Link to comment Share on other sites More sharing options...
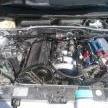
Goce Posted May 20, 2016 Author Report Share Posted May 20, 2016 Today's job is to enlarge the spacer hole for the new throttle body, it clearly shows how much bigger is the new throttle body, i cut the throttle body flange from the intake manifold because it faces the wrong way, i neet to enlarge its hole too, and sand it smooth, that is the roughest casting i have ever seen, it's like the surface of the moon, as for the rest of the manifold i probably will make i new collector from sheet aluminium to be smooth and smaller to fit the space i have available, more to come. Quote Link to comment Share on other sites More sharing options...
Goce Posted May 21, 2016 Author Report Share Posted May 21, 2016 Today my turbo oil feed arrived, i was planning to run a hardline, but this one was at a good price and the line itself is stainless steel braided teflon, the T3 flange it has a small hole for the oil to pass in the turbo only 1mm, i plan to drill it out to 4mm , that's the size of the line, not sure is that big enough, any advice? Quote Link to comment Share on other sites More sharing options...
Bean Posted May 21, 2016 Report Share Posted May 21, 2016 I know the newer ball bearing turbos need oil restrictors if I remember correctly, but I'll need to verify what the T3 journal bearing turbo uses as that should be the same. Rabin Quote Link to comment Share on other sites More sharing options...
my3AWDgst Posted May 22, 2016 Report Share Posted May 22, 2016 That's pretty crafty thing you did on that input shaft with a drill,looks like it came out really nice and precise. Sometimes these things work out really well,dissembling transmission and dealing with machine shop would be too much of a hassle and on the end it took you only few minutes to get it done with hand tools. I'm curious to fined out why you haven't choose to use engine-transmission plate to fit engine to gearbox? Quote Link to comment Share on other sites More sharing options...
Goce Posted May 23, 2016 Author Report Share Posted May 23, 2016 Thank you Savo, you are right dealing with machine shop is a pain, machinist in my country are like dealing with a hustler, they will say anything to raise the price up and i'll end up paying more then the gearbox is worth, doing it my shelf save me the trouble, i'm more proud of the clutch pressure plate than the input shaft because there was no other way and the machine shop told me is impossible to enlarge it, it is spring steel. The reason why i did it like this, is because the gearbox bell housing was too long and when i shorten it there were only two lower holes which did not line up, so i decided to use the upper part of a BE3 gearbox, that way my starter, crank sensor and 3 bolt holes lind up. Yesterday i cut a XUD7 block and crank in half and made a stand to hold it at 30 degrees to make it easy to line up for welding, now i'm waiting on my friend to find some free time to weld it. Quote Link to comment Share on other sites More sharing options...
Goce Posted May 23, 2016 Author Report Share Posted May 23, 2016 Couple of weeks ago the harddrive on my pc died and i lost all my old pictures and videos, but thanks to youtube, one survived is very bad quality (vga phone camera) but shows how good the 4WD system on the mi16x4 is, that is a hill. Quote Link to comment Share on other sites More sharing options...
Goce Posted May 25, 2016 Author Report Share Posted May 25, 2016 Last couple of days some more parts arrived first of which is a air/fuel ratio gauge, blow off valve and flange, coolant expansion tank, level sensor and cap, and couple silicone vacuum hose, and screw in vacuum nipples, and made some progress on the gearbox, more to come. Quote Link to comment Share on other sites More sharing options...
Goce Posted May 26, 2016 Author Report Share Posted May 26, 2016 This update is couple of days work combined, i've cut a spare engine block and crank and welded legs to it, it is easier to move around, gives me access to the bolt holes.Then took it to my friend and line it up for welding, then we welded them together, the peugeot flange to the RWD gearbox, there was a big gap to fill, and the gearbox wasn't the cleanest aluminium, but my friend is a real pro at welding, for the last bolt hole we weld a new bolt flange from scratch, by stacking weld on weld. Tomorrow i need to check is the flange square to the input shaft and drill and tap the last bolt hole and then it should be a rare thing a XU engine RWD gearbox. Quote Link to comment Share on other sites More sharing options...
Goce Posted May 28, 2016 Author Report Share Posted May 28, 2016 i've been working hard on the mi16, i've level the gearbox flange it moved while welding but i was able to make it straight then i drill and tap the last bolt hole, after that i was able to united the engine and box, then i started on the interior, i need to make room for the gearbox to enlarge the tunnel, i had a lot of trouble with one bolt on the seat, i had to drill it, later i have to fix it, after the seats i remove the center console, shifter and then cut the floor pan to make room for the gearbox, tomorrow i need to make some support to be able to support the engine from the bottom i'll make it adjustable to make it easy to test fit the steering rack in different positions. Quote Link to comment Share on other sites More sharing options...
andrethx Posted May 29, 2016 Report Share Posted May 29, 2016 holy crap. this is completely insane, and really cool. Quote Link to comment Share on other sites More sharing options...
Goce Posted May 29, 2016 Author Report Share Posted May 29, 2016 Yes andre is a radical process what i have to do to get RWD 405 but hopefully it will be worth it at the end, i haven't test fit the engine in the engine bay but i'm surly going to have some interference of the engine and the hood, not sure what to do about it i like my cars looking as stock as possible and a hood scoop will ruined their looks any suggestions anyone? Quote Link to comment Share on other sites More sharing options...
Goce Posted May 30, 2016 Author Report Share Posted May 30, 2016 The work continues i started by offering the engine and box in the car, it would not fit, i cut the firewall little more and again no fit, then realize that they are too high, then i unbolted the cross member and cut the main cross member, it was very thick steel, i used up a full package of cutting discs, then the engine fit like a glove, pulling the engine in and out took me all day, i let the engine on a spare tire just to see how it looks, and it needs to move back in the bay, the steering rack will be a problem, there is enough space for the turbo and exhaust more to come. Quote Link to comment Share on other sites More sharing options...
Goce Posted May 31, 2016 Author Report Share Posted May 31, 2016 Today started the day by getting out an old engine dolly, i use those simple frame with wheels to store and move around spare engines in the garage, first mod was to shorten it, then i weld a broken car jack because it can move and welded two limiting pieces, than installed it under the engine and in place made two more mountings using two more car jacks and by the looks i need to cut a hole in the fire wall for the distributor if i move the engine 12sm in, i will get clearance to the bonnet more space and for the steering rack, and better weight distribution, the strange thing is the valve covers paint is bubbled up completely not sure what made it, by moving the engine by the valve cover it peels in my hands now is bare aluminium, is ugly now. Quote Link to comment Share on other sites More sharing options...
Goce Posted June 1, 2016 Author Report Share Posted June 1, 2016 Today i went to the breakers yard to get a smaller steering rack, got one from a Fiat is much smaller and should work, got a few more things. It is hard work pulling the engine and box in and out of the engine bay, i needed a day to rest more to come. Quote Link to comment Share on other sites More sharing options...

Recommended Posts
Join the conversation
You can post now and register later. If you have an account, sign in now to post with your account.