Bean
-
Posts
5,854 -
Joined
-
Last visited
Content Type
Profiles
Forums
Gallery
Events
Collections
Everything posted by Bean
-

What am I missing on the Turbo hose? 85 505 N9T
Bean replied to TommyM's topic in Peugeot 50x Series discussion
I checked my N9TEA tonight and I guessed close but not quite - the ecu controlled Boost solenoid is connected to the smaller line on the intake pipe, so it must vent back into the intake pipe. My car has a custom steel intake pipe, but it has the smaller line. All my spare N9TE intake hoses just have the single big PCV connection. Initially I was going to use the PCV connection for boost recirculation, and if that smaller line isn’t being used on your car you could use it as the vacuum source for an oil catch can as they’re usually about that size on modern cars. -
Damn - that looks sweet! Looks completely stock “plus”, and you should notice EVERYTHING works better with that alternator. Electrical is buffered by the battery and limited by the voltage regulator, so the circuit should only draw what it needs rather than get overloaded.
-
What am I missing on the Turbo hose? 85 505 N9T
Bean replied to TommyM's topic in Peugeot 50x Series discussion
I wonder if it could be used for boost recirculation? Using the big port for boost recirc (if you wanted), and the other for PCV vacuum source could work…. Maybe? -
What am I missing on the Turbo hose? 85 505 N9T
Bean replied to TommyM's topic in Peugeot 50x Series discussion
Hi Tommy, None of my turbos have had a second line off the AFM hose, but the it’d be easy enough to either cap it, or use it for a catch can vacuum source. I wanted to put a oil catch can on my car so picked up a Provent 200, but the vacuum source off the AFM is usually effective at higher rpm. Both my Volvo and BMW have high and low PCV circuits. Low rpm vacuum from intake, and high rpm vacuum from AFM. -
There’s a power distribution block on the positive battery cable that powers accessories and various circuits - I’d check there as well.
-
If the through bolt is nice and snug in the alternator hole then I doubt you’ll need an L bracket on the front, but the more secure you make it the better. Sunroof cables notoriously fail with the sheath splitting, so it will pull the sunroof open, but when you close the cable pushes out of the sheath and it can’t close it. PO likely figured there was an issue with the motor, but you’ll need to access the cable itself to repair it. One of the long term members used hydraulic hose to replace the cable sheath and it worked great.
-
That looks really good - V belts can take a fair bit it misalignment and still be fine - my GM alternator retrofit was off a good 10mm but was quite far away (40 - 50cm) from the crank and water pump pulleys and it was fine. I did it in a hurry with the idea of redoing the mount later, but the belt never gave me any issues at all after install.
-
How far out is the pulley if you bolt it in place as is? The new alternator has a wide mount so it likely would be quite stable with just one shear plane and the bolt through both. If it were me I’d be tempted to alter the mount to accommodate the alternator so that it’s a bolt on. That way future repairs / replacement are bolt on affairs. There’s no real value in keeping it original, or it not being able to go back 100% stock since you’re making it better.
-
You basically need to find and fit an OE electric fan shroud to the radiator - You can usually use the rad temp sensor to trigger the electric motor via a relay, but just make sure to fuse the power feed to the rad temp sensor as it’s not a protected (fused) circuit - So if it ever shorts out it will burn into the main wiring harness.
-
Are the connector pins the only connections? I’d assume it still had a lug for the heavy gauge wires, and the “S” would be the 12V signal wire off the original (black or the other smaller yellow wire that gets 12V signal?) Curious how it lines up!
-
Turbos muffle the exhaust noise quite a bit, and the stock mufflers had a tendency to have broken baffles inside which rattled. You can’t really get it louder than a straight pipe, but a good resonator and a muffler can deepen and smoothen out the 4 cylinder sound so it doesn’t sound like a small diesel tractor!
-
I had no idea such things existed either! I went with electric to hopefully reduce the noise/clatter a bit, but I like the simplicity of having it integrated into the alternator. Would assume it’s pretty quiet as well.
-
What are steps are you going to do now? I need to do the same to mine, and was thinking cut and replace as well, but will depend how strong the metal is under. Por-15 with a top coat might be good - I was fairly impressed with how well the battery tray for my 505 TD turned out - it was quite rusted and the metal was pretty thin, but a couple coats of Por-15 made it quite good.
-
I was just going to suggest replacing with an electric vacuum pump - The mechanical once are really quite noisy and add to the diesel clatter a fair bit. I bought a Hella pump that I was going to try with my diesel, mostly as an NVH reduction measure just so the car isn't so loud, but also to hopefully simplify the underhood mess of hoses! Feel free to document the install - I'd be curious what pump you get, how you wire it in, and where you put it. Rabin
-
Hi Fred, Do you know what the engine series is? The XN1 or XN6 4cyl out of the 504/505’s might work, but hopefully @Mike T can weight in on any other cross overs? (I was just speculating) Rabin
-
Were you wanting an OE replacement or did you want to upgrade? The 80A GM two wire alternator is usually a pretty close bolt on upgrade with a little work. For OE replacement you could try the suppliers in the Vendors section, or even calling around to see if it can be rebuilt. Great wagon BTW - looks like it’s in great condition! Rabin
-
1986 505 TD 5sp sedan - Troubleshooting WOT start
Bean replied to Bean's topic in Diesel specific tech
I’ll check the mesh inlet and outlet filters, just for preventative maintenance, but the car starts up great - it just revs immediately once it fires. So I’m curious if you’re pull starting it, or pulling it to spin the IP? Only way I could pull it would be with ignition off so fuel cut solenoid didn’t have power. @SRDT - No worries, we never got any of the smaller cars, so had no idea they switched. The 405 had the ve pump so assumed all the little diesels did too. I’m fairly confident I’ll be able to fix it as long as it’s repairable. Definitely a lack of experience, but I’m learning quick and have a much better understanding of how it works and how to tune them. Rabin -
The calibration thing if getting into the guts to reseal it was from seeing the experienced guys on VWDiesel.net comment on post after post when guys tried resealing their pumps and then had issues after. The bench calibration thing for rebuild was to just make sure the pump is actually working and calibrated properly - things like internal pump pressures that will have huge implications on how the pump runs. I don’t doubt you’d be able to reseal it and have it working again, but how would you know if it was fully optimized and running the best it could? That’s some of the reasons I ran across for just getting the pump professionally rebuilt, calibrated, and tuned. Giles at Performance Diesel in Canada was WIDELY commented on the VWdiesel.net site of being one of the best VE pump builders, and it was said many times that if you can afford it, it’s the best money spent. Sadly the pump is still boxed - project ground to a halt due to busy kids/life - but I still have EVERYTHING, and I’m hoping to resurrect it. The sedan was meant to be a parts car for the wagon to make it a 5sp, but I wavered and figured both cars are so rare they should both be saved! Both cars have rust issues, with the wagon dog legs and rear quarters being pretty bad. Sedan isn’t bad, but has rust in the front fenders, and spots around the car. The idea for now is to get the sedan running and then decide what to do. BTW - the leaking pump might just be a leaking pump for a reason, but it sounded like it may have been sitting. Definitely worth a try to see if it comes back on its own, but I’d only give it 1 - 2 weeks, and only if it’s very slight / weeping kind of leak - if it’s a good drip then new is likely best.
-
I would run fuel conditioner in it and just get some miles on it first - heat cycles and use could resolve it over time. I bought my sedan knowing the IP leaked, but when we got it going and I drove it 8 hours home it was leak free after that. It’s now sat for a couple years, so will see what happens when I get it running again. Rabin
-
1986 505 TD 5sp sedan - Troubleshooting WOT start
Bean replied to Bean's topic in Diesel specific tech
Thanks Goce! Vinyl lines were for troubleshooting bubbles in fuel supply only, I have proper fuel lines. The plastic pre filter is a filter recommended on the Mercedes IDI forums. I did test and make sure it wasn’t the source of any issues, and I like the idea of having one but not married to it. I’ve removed the plastic filter while focusing on fixing the IP, and if it gets fixed then all lines will get return to proper fuel line. The orange plastic line is fuel grade fuel line between the injectors. I also want to update the stock filterhead to something more modern, and the bulb primer could be part of that, or an electric lift pump. I spent HOURS on returning the car yo that stock Purflux filterhead and it was a MAJOR pain in the ass to get it leak free. I like the idea of pulling the car in gear, but do you do this to start the car or to free the pump with fuel solenoid off? Car current starts great but goes WOT immediately, so it’d start quick and surge forward with full acceleration without the fuel solenoid disconnected. Rabin -
I’ve been doing a LOT of research on these pumps and the overwhelming conclusion is that simple resealing and work in the top cover is DIY, but once you’re into resealing the body and the internals need to come apart - it really needs a proper test bench to ensure it’s set up properly. Lots have had “success” just putting a seal kit in, but with no baseline or idea of what they *should* run like it’s a pretty big crap shoot… That said -pretty sure the o-ring that seals the distribution block might be pretty safe to do, it’s the full tear down and reseal that I’d likely send out so that it could be rebuilt and set up properly. Rabin
-
Bomjour!! Introduction, my first Peugeot, 1981 505 TD
Bean replied to LBC28730's topic in General Peugeot discussion
There’s something about having proper paper manuals to work from - great score! I’ve started working on my 86 505 Turbo 5sp sedan the last few weeks myself - got the proper filter head fitted into it after fighting leaks for weeks only to find the IP governor assembly is stuck so it starts and stays WOT! I sourced some new seals for the IP top cover, accel shaft, and a diaphragm for the fuel pin just in case - hoping to tackle it soon. IP’s are internally very similar to the IP of the VW IDI injection pumps. I have spare pump resealed and built with AAZ goodies many years ago, but saving that for my wagon if I ever get to it. I’m slowly building my diesel experience, and if you need help with bleeding the fuel system or the filter head - I know these well now! Rabin -
1986 505 TD 5sp sedan - Troubleshooting WOT start
Bean replied to Bean's topic in Diesel specific tech
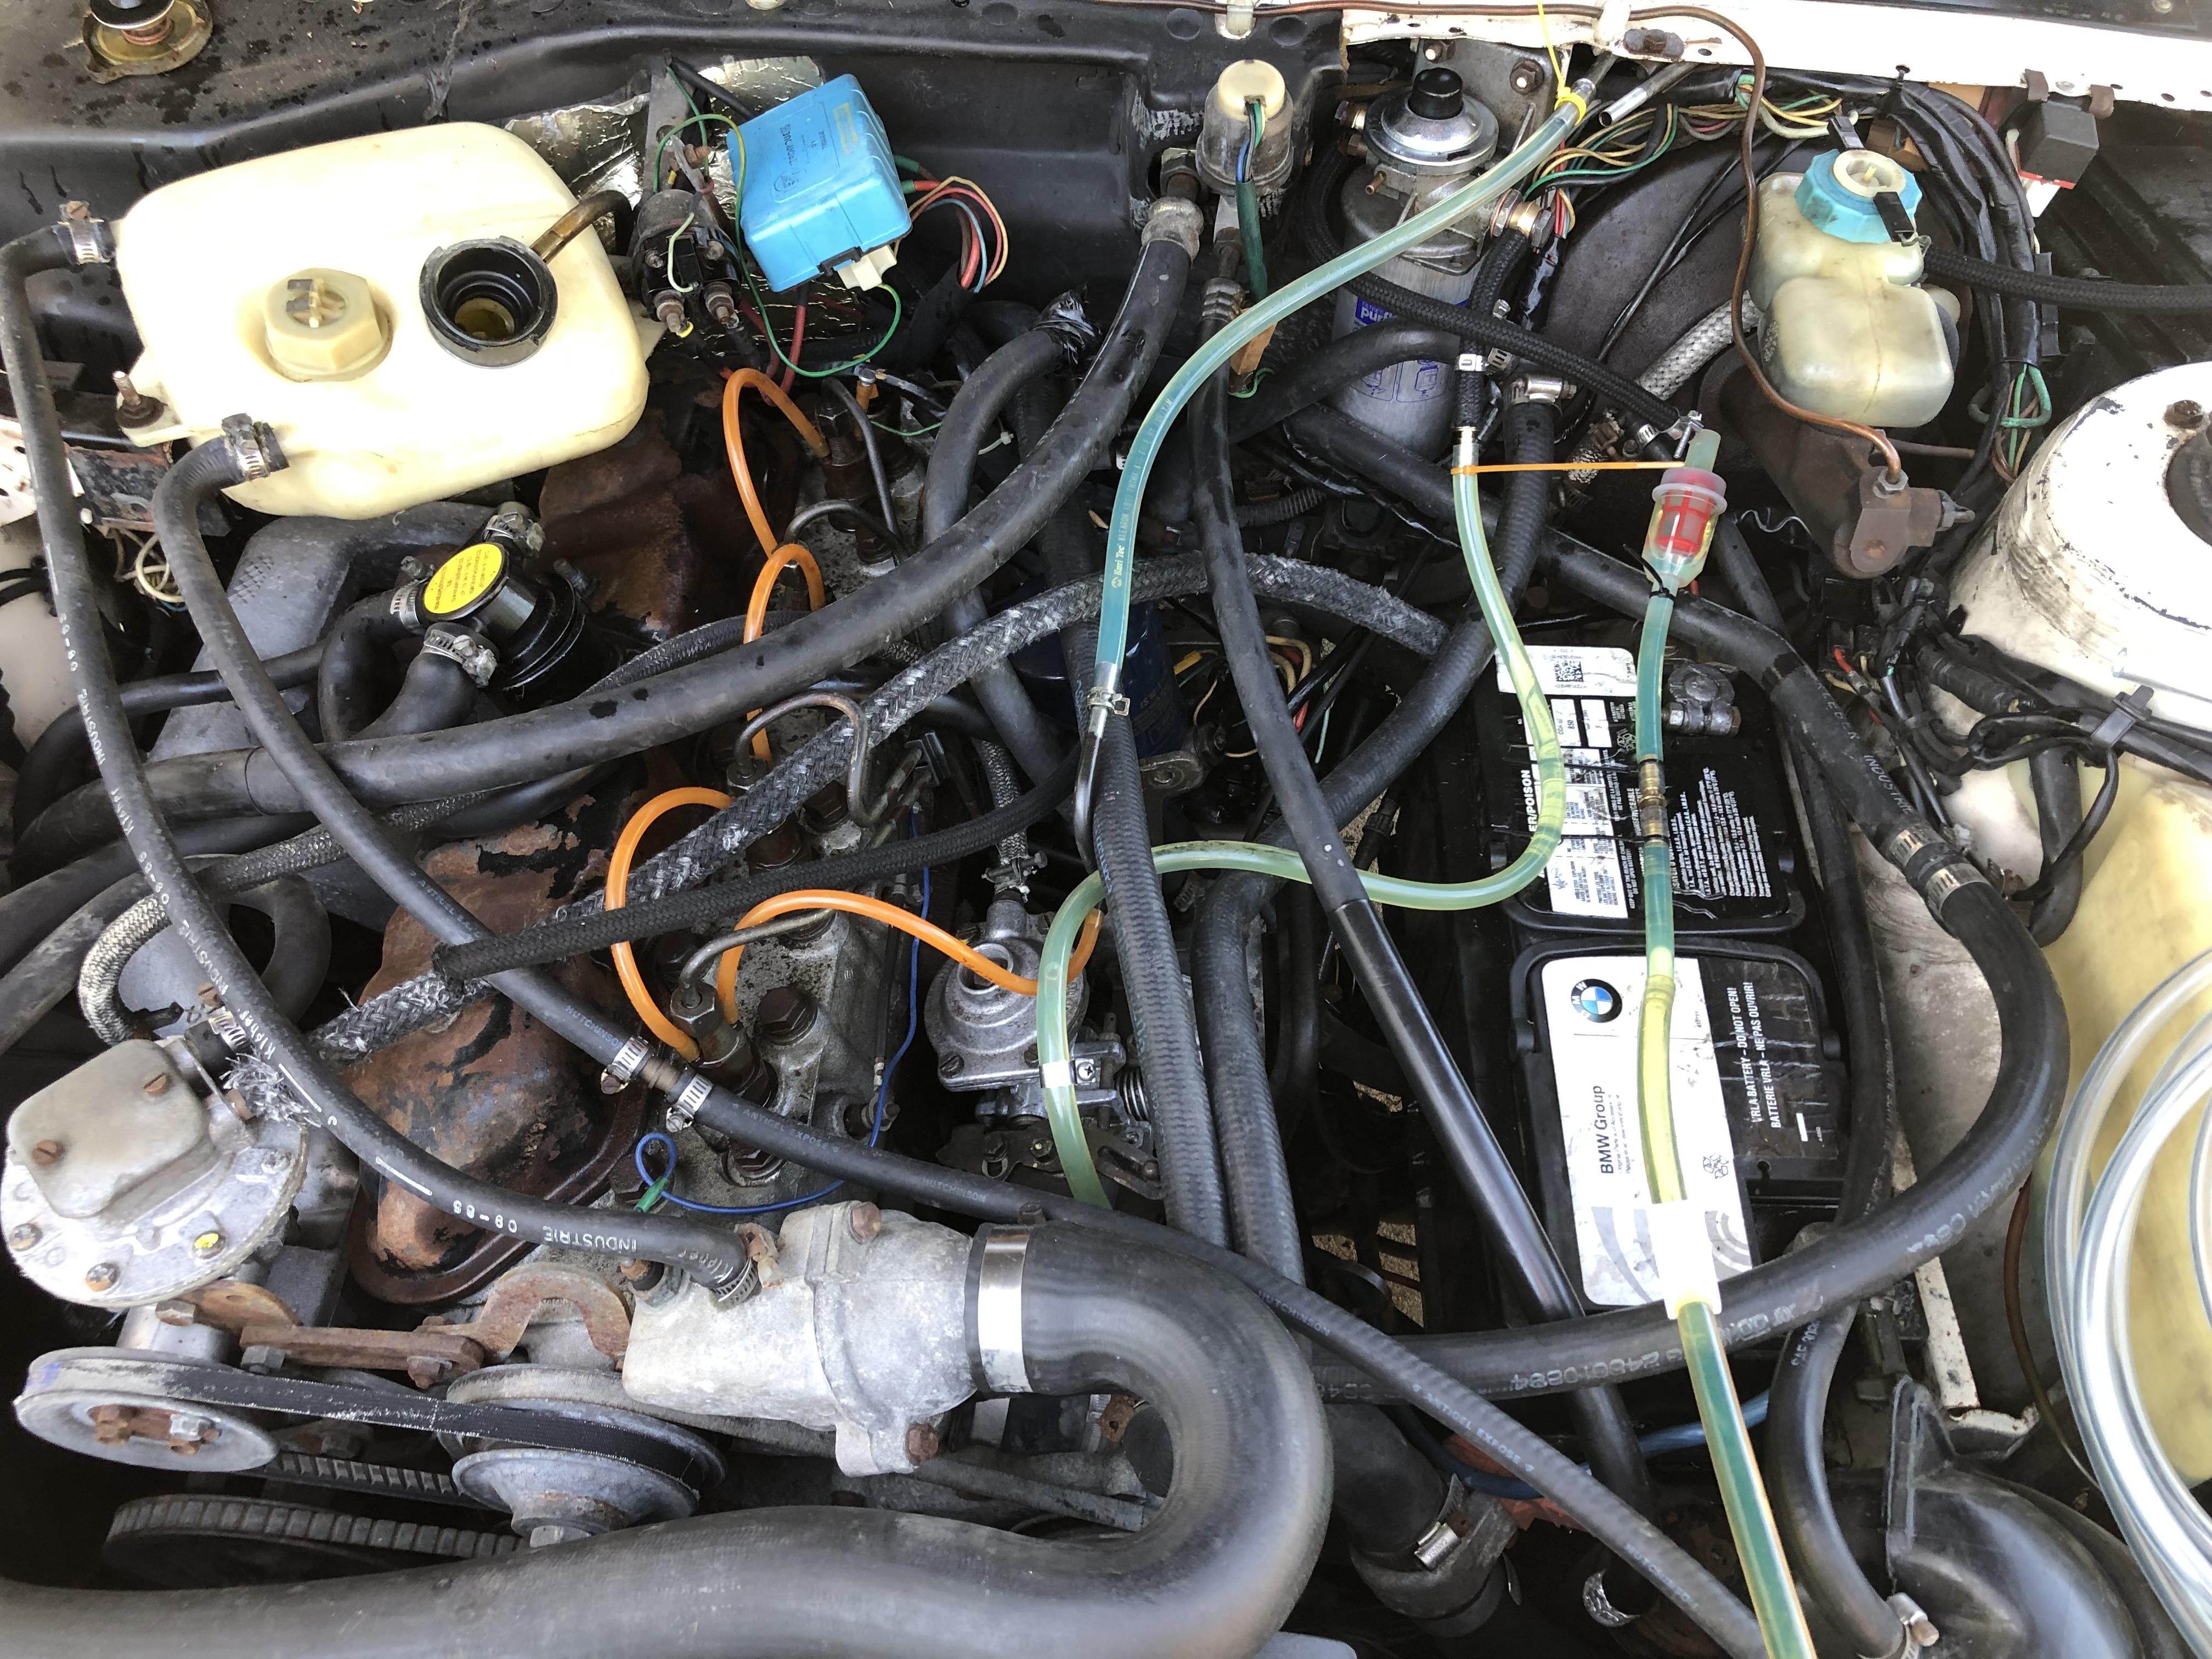
Picture of the final set up - used diesel in a Motive Power Fill to provide pressurized diesel to the filter head. Could then bleed the pump and lines easily. Mucked about with all sorts of contraptions using a vacuum pump, but likely did more harm than good! This was best by far: Line on right is from the power fill bottle with ~5psi. Did a whack more research and I think I can remove the pump top in situ to see if I can free up the governor assembly. Hoping to source the accel shaft and top cover seal locally, and if so I’ll give it a shot. ”While I’m at it” I’ll do the governor mod to the main spring, as well as some off boost tuning of the LDA - if I can fix the pump governor I may as well make it bit more peppy. @Goceand @SRDT @wadehilts - Not sure who else has Bosch VE experience, but any advice/tips on removal/Installing the IP from an xd3t would be appreciated in case I need to pull the pump or replace it. Rabin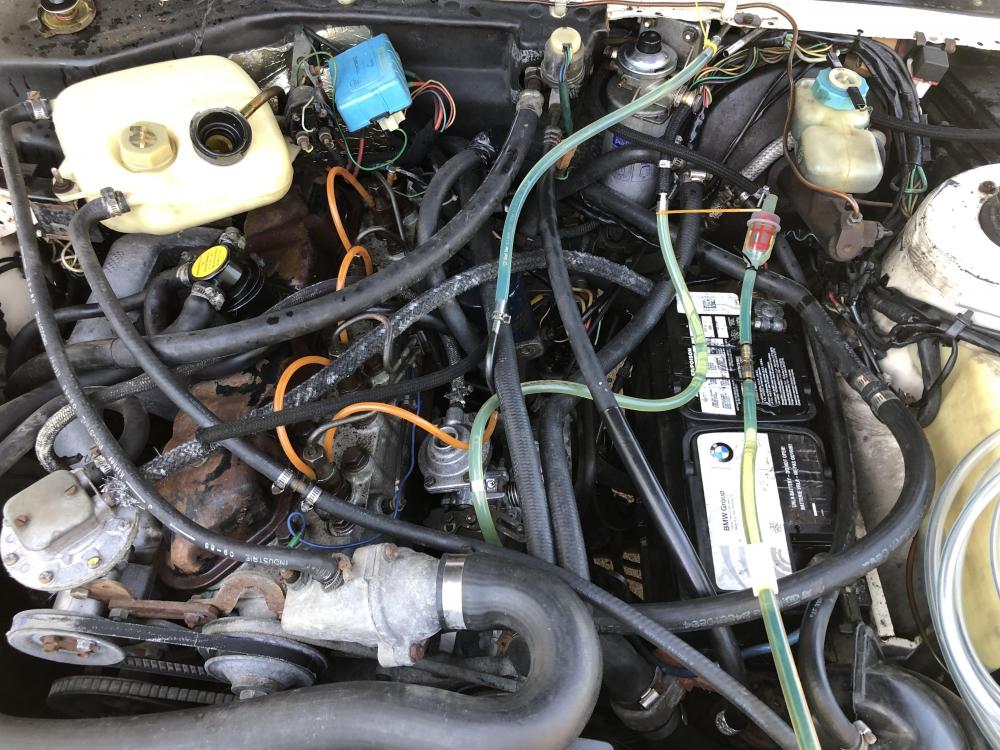
-
Hi guys, I’ve been fighting my ‘86 505 TD sedan trying to get it running. Had a crazy ordeal replacing the filter head and spent a ridiculous amount of time finding and fixing air leaking into injection pump - cliff notes summary: Original primer diaphragm was ripped inthe glass jar filter head from a 504 (?) - So I replaced it with a NOS filter head with a used alloy canister and new filter. Loaded it up with Liqui-Moly Diesel Purge. Liqui-Moly Diesel Purge melted the NOS filter head diaphragm. Bought a replacement diaphragm and installed - still leaks air. Replaced all lines with clear vinyl to see where bubbles are coming in. Found cracked fitting - swapped all fittings from original filter head - still leaks air into fuel. Test with a different vacuum set up. Canister drain leaks air into fuel under vacuum - install new alloy canister - still leaks air. Wrecked new diaphragm testing trying to find the leak - too much pressure? Too much vacuum? Replaced diaphragm again with 2nd kit I bought - still leaks air. Try yet another vacuum test set up on the IP return to pull diesel through and still find bubbles entering. NOS filter head itself is the only thing I haven’t replaced - Moved all fittings and primer diaphragm to the old filter head and no leaks - finally! But now the heartbreaker - the Bosch VE pump is stuck - they normally start fully open, but once it fires it should immediately idle back, and it’s not doing that. It starts and goes full throttle immediately, but thankfully shuts off with the key. Not sure I can do anything to the pump while it’s installed to free it up, but if it doesn’t free up by itself I’ll need to swap in the resealed pump I had built years back. If anyone has some advice or some tips or hints to free up the VE Pump I’d appreciate it! If not I’ll be researching removing and installing the resealed injection pump I have, and praying the resealed on is fine after being stored so long. Rabin
-
The tell tail sign is bubbles in the coolant when the head cracks, smoking out the tailpipe is something else as the crack leaks combustion pressure into cooling system, never coolant until the HG fails completely from an over heat due to coolant getting pushed out. It can go quite a long time on the cusp of pressurizing cooling system - and it can get stay usable a long time with proper cool down and warm ups (never beat on it cold!). Rabin